

GardenerHeaven.com is reader-supported. When you buy through links on our site, we may earn an affiliate commission.
Flowers are great at enhancing the aesthetics of your home. They, however, need a lot of care to maintain their beauty; much of this care involves needing to edge their beds. Though you can effectively do it manually, using a power edger will be a lot more effective.
Despite the greater effectiveness, using a power edger tends to be a lot more fun. This article will provide you with a step-by-step guide on how to edge a flower bed with a power edger.
Safety First
Being a motorized machine, the power edger could be very dangerous when used incorrectly. When used carelessly, you could suffer from a severe accidental injury. Before making use of a power edger, make sure you follow the instructions below.
- To protect your eyes and ears from flying rocks and splinters, make sure you have eye and ear protection. Having ear protection could also save you from hearing loss from the loud motor.
- Wear full-sleeved shirts and pants. These will offer complete protection for your limbs.
- Wear boots or fully covered shoes to protect your feet.
- Service the power edger occasionally to ensure it has no malfunctions that could lead to an injury.
- When using an electric power edger, ensure the power cord is secure and well connected. A loose connection could be a safety hazard that could lead to a fire.
How to Edge your Flower Bed with a Power Edger
Here are the steps you need to follow to edge your flower bed using a power edger.
Step One
Picture the design you would like your flower bed to have. This is the conception of the characteristics of the flower bed to be able to source what you need. The design should be in line with the surrounding of the house. The beauty of a power edger is that even if the edges are established, you can always reshape them if you change your mind.
Step Two
Based on your design, mark the edge lines on your flowerbed. If you already have an established design and wish to maintain that same design, you can skip this step. If you have a smaller vanishing bed, you can use a vanishing spray to make the marks. The spray only lasts a couple of hours, giving you enough time to work.
For larger flower beds, permanent marks would be the most suitable. Larger beds will often take longer to edge; hence you need the spray or marks for the permanent marker to guide you. This guide will dictate how you will use the power edger.
Step Three
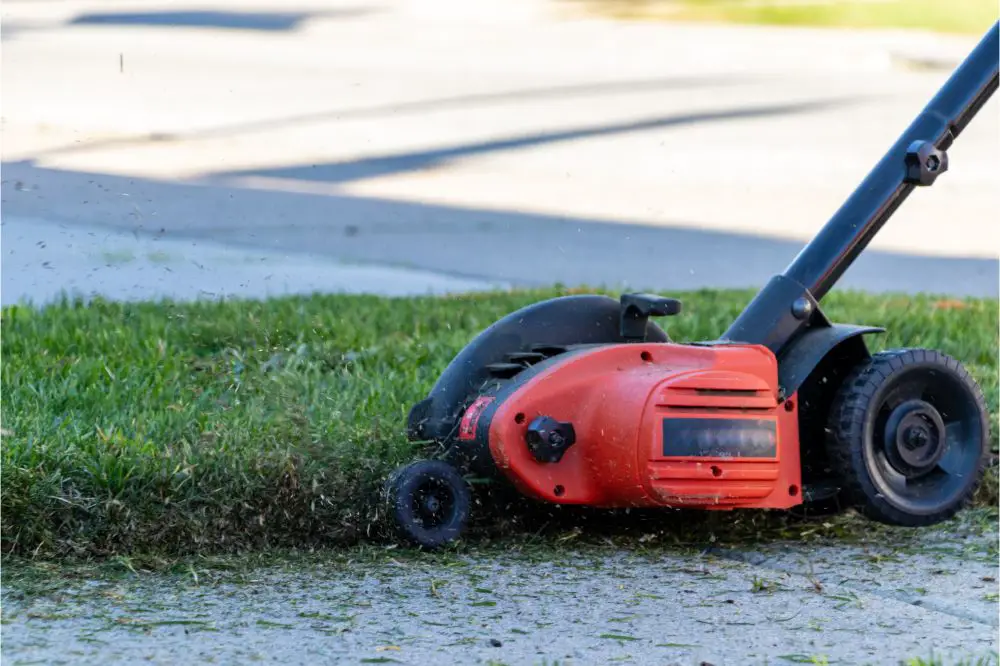
Tug the start-up cord or press the trigger button to activate the power edger. You have to make sure the power edger is disengaged until you guide it to the right place. This is to make sure you do not injure yourself with the power edger.
Using the marks you have made as a guide, you should place the power edger and continue to clear up the bush. With the power knob, you can change up the motor’s power, giving you an extra level of engagement with the machine.
Continue to move it along the edge of the marking you had made. This is to ensure no damage comes to the flower bed design.
Step Four
We understand the temptation to create a brand new design while edging. This is not advisable as it takes more than one pass to get the look. Attempting it would certainly ruin the flowerbed; you are instead advised to only edge established flower beds.
You might be concerned about the really loud sounds coming from the power edger. This should not concern you as it tends to happen. Should the power edger go through very rough and rocky ground, pull back the edger and attempt to get it back through in a gentler fashion. Do not push the edger too fast or you run the risk of damaging it.
Step Five
After you are done edging, ensure you clean off the mud and grass on your power edger. If you are planning to make a second pass at the flower bed, ensure you clean the path of the fallen twigs. This will clear the path making the edging process the second time around a lot more effective.
Cleaning the power edger also extends the lifespan of the machine. The bits could get jammed and end up damaging the machine.
Step Six
You do not need to sweep off all the uncovered soil and twigs; simply tuck them in the flower bed. This will improve the health of the bed and the surrounding lawn. Make sure you do this every time you edge a flower bed.
Tips to Improve the Life of the Power Edger
- To save power and enhance its lifetime, make sure to switch off the power edger when it is not in use.
- When taking a break between edges, make sure to turn off the machine and take the blades off. This is done to avoid accidents.
- All manufacturers have their standard operating procedure included with their power edger. Always make sure you are well acquainted with it.
- Edging more than a couple of times a year has adverse effects on the overall health of a flowerbed. Moderation will often produce the best results for your flower bed.
- Ensure you keep the edge no deeper than 6 inches. This will improve the overall health of the flower bed.
Conclusion
A flower bed only looks its best when it has been properly edged. In that endeavor, a power edger helps you do that more effectively when compared to going a manual route.
You have to ensure you have a proper grasp of the machine’s standard operating and handling procedures before you can handle it. This will help avoid accidents when operating the machine and enhance its lifespan. Following the step-by-step procedure will act as a guide to working with a power edger.

